This article was originally published on the web on digitalseed.com however that website is defunct at April 2014. The copyright is with the original owners of digitalseed.com
Worm Your Way Into Composting
Don't think you have any room for composting? (small yard, apartment or condo dweller?) How about a worm bin? Now, don't make that face. Worm bins are easy, don't smell, are a great way to recycle food, and are lots of fun (kids love them) and you end up with a great amendment/fertilizer for your plants (including house plants). You can buy commercial worm bins but it's cheap and easy to make your own.
Materials Needed to Make an Easy Harvester Worm Bin:
- Two 8-10 gallon plastic storage boxes
- Drill (with 1/4" & 1/16" bits) for making drainage & ventilation holes
- Newspaper
- About one pound of redworms
- Drill approximately ten ventilation holes on each side of the bin near the top edge using the 1/16 inch bit . Keeping the ventilation hole small will help prevent fruit flies from entering the bin.
- Drill about twenty evenly spaced 1/4 inch holes in the bottom of each bin. These holes will provide drainage and allow the worms to crawl into the second bin when you are ready to harvest the castings.
- Prepare bedding for the worms by shredding newspaper into 1 inch strips. Worms need bedding that is moist but not soggy. Moisten the newspaper by soaking it in water and then squeezing out the excess water. Cover the bottom of the bin with 3-4 inches of moist newspaper.
- Add your worms to the bedding. One pound of redworms will process 3-4 pounds of food scraps per week. There are roughly 500 worms in one pound. If you start out with less than one pound, don't worry they multiply very quickly. Just adjust the amount that you feed them for your worm population. You also want to add a handful of soil or finely ground eggshells to the bin to provide the worms with grit to help them digest their food.
- Place your bin in a well-ventilated area such as a laundry room, garage, balcony, under the kitchen sink, or outside in the shade. Place the bin on top of two wooden blocks or bricks to allow for drainage. You can use the lid of the second bin as a tray to catch any moisture that may drain from the bin. This "worm tea" is a great liquid fertilizer.
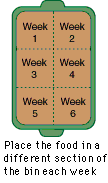
- Feed your worms slowly at first. As the worms multiply, you can begin to add more food. Bury the food in a different section of the bin each week. The worms will follow the food scraps around the bin. Burying the food scraps will keep fruit flys away.
What do worms like to eat? Your worms will be happier on a vegetarian diet. Most things that would normally go down the garbage disposal can go into your worm bin (see the list below). You will notice that some foods will be eaten faster than others. Worms have their preferences just like us. They seem to love watermelon and coffee grounds. Worms need calcium to reproduce so add eggshells every once in a while or, if you don't eat eggs, grind up a Tums and throw it into the bin.
What should go into your worm bin? Yes! No! Bread
Cereal
Coffee grounds & filter
Fruits
Grains
Pasta
Tea bags
VegetablesDairy Products
Fats
Meat
Faeces
Oils
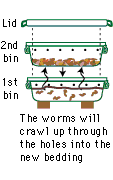
Twigs - Harvest the finished compost when the first bin is full and there are no recognizable food scraps. Place new bedding material in the second bin and place the bin directly on the compost surface of the first bin. Bury your food scraps to the bedding of the second bin. In one to two months, most of the worm will have moved to the second bin in search of food. Now the first bin will contain (virtually) worm free vermicompost.
Step 1
Step 2
Step 3
Step 4
Step 5
Step 6
Step 7
Troubleshooting
| Problem | Probable Cause | Solution |
|---|---|---|
| Worms are dying or trying to escape | Too wet | Add more bedding |
| Too dry | Moisten bedding | |
| Bedding is used up | Harvest your bin | |
| Bin smells bad | Not enough air |
Leave lid off or drill more ventilation holes |
| Too much food | Do not feed for 1-2 weeks | |
| Too wet | Add more bedding | |
| Fruit Flys | Exposed food | Bury food in bedding |