This article was originally published on the web on thealpinegarden.com however that website is defunct at May 2015. The copyright is with the original owners of thealpinegarden.com
The Rock Garden - construction
by Alan Grainger
Planning - Construction
Site Preparation
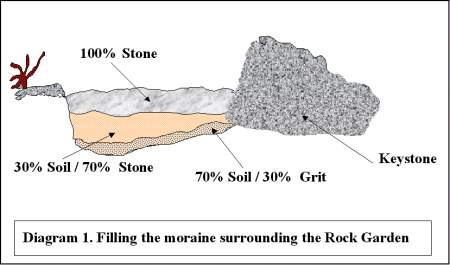 One thing is absolutely critical and that is the preparation of the site. Time spent on this will be rewarded many times over.The base of the site should be thoroughly excavated and every weed removed. (Whether you do this by hand or chemically, is a matter for your conscience. I am not here to get into the debate of organic v inorganic). I would suggest that a depth of 45cm would be adequate. As this will form a home for the lower-lying rock plants, it will be necessary to fill it with a suitable moraine-type compost (See Diagram 1).
The size of this 'base' is arbitrary but should be somewhat larger than the Rock Garden "envisaged".(See Diagram 2 ). I say this because to start building with stone from the immediate edge of your design would look a little like the aforementioned 'dog's grave'. Better to lead up to the construction with a few feet (or metres if you have the space) of a 'moraine' type habitat.
Ordering the Rock
 Now this may seem quite obvious but have you considered where the rock will be dumped when it arrives? This too, requires careful planning. Remember that you could be required to move 2 or 3 tonnes of rock. If it is dumped 100 metres or more away from the site, this will be a very tiring exercise indeed. If it is dumped at the front of the house and the rock garden is to be built at the back, again this will be a task you could well do without. And even worse, if you live in an elevated position, will the rock be delivered to the lower street level? These are all matters that should be discussed with your supplier/haulier prior to taking delivery.
The Construction
Before the rock arrives, ensure that the ground has been thoroughly prepared as discussed in 'Site Preparation' above.
The laying of the first rock in your excavation is the MOST IMPORTANT piece of work you will do in the entire construction process. This will be the KEYSTONE and it should be laid at the bottom of the slope. Whatever angle this piece is laid at, will be the angle that all the other pieces must follow. The grain of the rock will determine how each subsequent piece must be laid. 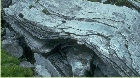 In nature, the rock is formed in strata, be it horizontal or vertical. In the garden, the rock must follow the same rules. Go out and see for yourself, take some photographs of different rock features and study them. This will be invaluable to you as you progress with the construction.
Experiment with the keystone, don't necessarily use the first piece you try. Try others and see what different effects are created. When laying this and any of the other stones, it should be 'planted' in the earth. That is to say, it must be firmly embedded in the soil. A number of reasons for this. In nature, few, if any, rocks actually sit on top of the earth...they appear to 'grow' from the earth and this is the effect you need to create. Secondly, at some stage, whether weeding or planting or collecting seed etc., it may be necessary for you to stand on these rocks and so they do need to be stable. 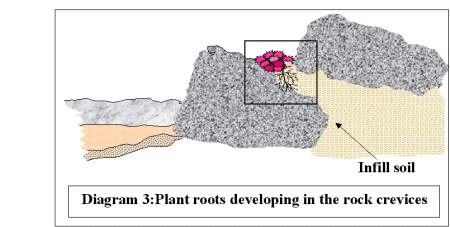 Thirdly, the plants like a cool root run and put their roots under the rocks. Any instability and movement will undoubtedly cause root damage to your favourite plants.
Having laid the first stone, laying the rest continues to adopt the same principles. I am not a gambling man but I will wager that before you have laid half a dozen rocks, you will alter them in some way. This is all part of the design process and adds to the pleasure (?...well, it may not seem pleasurable having to manhandle large rocks but the end result is worthwhile).
Infilling
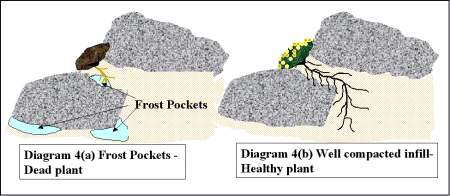 Once you have constructed the first level, it will be necessary to in-fill this with a suitable soil mixture (See 'Soil and Composts'). This is a most important part of the process and must be done with great care. The 'infill compost' needs to be firmly packed under, behind and in-between each piece of rockwork. This is necessary to prevent spaces for frost to penetrate. Providing you have mixed a 'suitable' compost for this infill, firm packing will not mean solid compaction. There will still be, rather must be, sufficient aeration properties in the infill compost for drainage and oxygen. What you must try to avoid are pockets where the roots will surely penetrate but find no compost. This will mean almost certain death to your plants. Continue the infilling process during each stage of construction until you are happy that your rock garden looks and feels "right".
Soil and Composts
It is generally considered, that a rock garden will be planted up with plants that normally grow on rocks and not in woodlands or peat bogs. To this end therefore a compost with a ph level of c. ph7 +/-1 would be ideal as a growing medium. The compost must be well drained, yet moisture retentive and that would indicate the addition of both grit and peat to the basic loam. Many of you will already have established your favourite recipes and I would not discourage you from using them but for the beginner, I would recommend equal parts of a loamy soil/grit/peat with a little added leaf mould for good luck.
The Patience Factor
Why does this always have to crop up in every article? Because that is what is needed for success. As in trough gardening, your new rock garden will need to settle down before you can plant it or it will look disastrous after the first winter. The soil needs to settle and in the case of a rock garden, it has lots of nooks and crannies to settle into. Despite your earlier vigilance and endeavour, the occasional perennial weed may have reared its ugly head, the occasional rock may have moved slightly out of position (I did warn you to embed them well, didn't I?), you may not have noticed the overhanging shrub that has been dripping all winter onto the area reserved for your Lewisia rediviva. These and other factors can affect your rock garden, so it is as well to be patient for the first few months at least. When you are confident that the structure has become stable and settled, it would be wise to 'top up' the planting areas with another layer of compost. (At this time, if you decided to have a scree-moraine type area in your design, it would be a good idea to add a 50mm top layer of compost over the surface and wash it in, with a hose fitted with a fine spray. This will ensure that no frost pockets form in this part of the garden).
Planting the Rock Garden
Ah! the plants. Where would we be without the plants?
A well constructed rock garden will provide many different habitats for your plants. Crevices and valleys will be created along with the moraine and scree conditions of the open terraces. There are a multitude of alpine plants eminently suitable for rock garden culture and it would be futile of me to attempt a comprehensive listing, when experience tells me that no two gardeners share the same preferences.
However, whether your choice is for the high alpine androscaces, or the more common but equally significant hybrid sempervivums, the same rules of planting will apply. If the majority of your plant acquisitions are seed raised, it may be as well to consider growing them on, in a compost similar to that of their eventual home. This will reduce the risk of failure when transplanting them into the rock garden. If you use predominantly nursery-grown stock, then talk to the proprietor and find out what mix he uses for his sale plants. A similar mix can then be added to the planting hole in the rock garden, which should ensure less trauma for the transplant. Another alternative is to remove the plants from their pots and wash off all the soil from the roots and transplant the bare-rooted specimen. This is a tricky exercise at the best of times and should only be attempted by the more experienced growers who will know "the right time" to do it.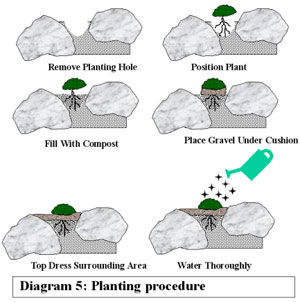
Again, I would not presume to tell the more experienced gardeners how to plant a plant. But if you are fortunate enough to know how to do it, then please have patience whilst I explain the principles (See diagram) to the beginner.
Remove the compost from the position your plant will take up and then take out a further 50%.
Insert your plant into the hole and raise it up approx 3cm above the surrounding compost.
Fill in the rest of the planting hole with the compost you removed and firm it around the roots of the plant, ensuring that the plant is secure in its new home.
Top dress the plant with pea gravel, stone, grit, or whatever was in your grand design, making sure that the 3cm gap under the cushion/rosette is packed tightly with this top dressing. Top dress the surrounding area with the same stone, to the same level. This top dressing will ensure that the cushion/rosette has perfect drainage underneath it (a mandatory requirement) and that the surrounding soil will maintain an adequate moisture level.
Water the plant thoroughly and regularly until it becomes established.
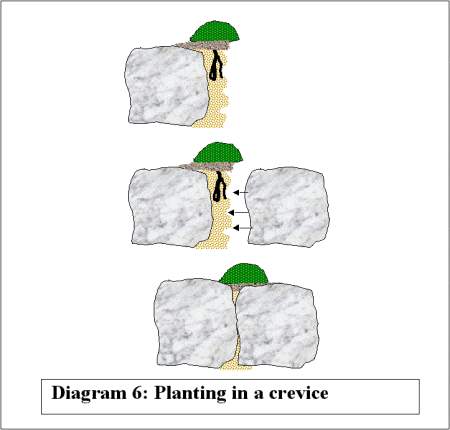 You will find, that to plant into crevices is a tricky operation. This is best done during the actual construction stage, thus avoiding the need to "squeeze" the plants into the smallest of spaces (See Diagram 6).
Leave a space between two pieces of rock.
Pack plenty of infill compost against the side of the left hand rock.
Plant your plant and top dress it as instructed previously.
Push the right hand piece of rock into position.
Sprinkle in some infill compost and water thoroughly.
I would hope that you are now ready, or at least prepared, to attempt that first (or even second ) Rock Garden. I would be pleased to hear from you if you have any comments to add to this article or even better, if you have used it to construct a rock garden. There is tremendous pleasure in any form of gardening but as I always say, no matter how elaborate the structure, be it a rock garden, a trough or a raised bed, the plants should always come first.