Maintaining a greenhouse
To get the full benefit of a greenhouse in your garden, you'll need to keep it well maintained. A check and rectification once a year should keep the task fairly straightforward, leaving it longer could mean that it turns into a big job - losing you time in the garden and a heavier impact on your pocket.
The checks required for a greenhouse are basically:
- Checking the base;
- Checking the greenhouse framework;
- Checking the glazing;
- Checking the ventilation;
- Checking the door of the greenhouse;
- Checking the guttering;
- Washing the greenhouse inside and out.
Doing the checks in this order should ensure that there is no need to revisit anything once it has been checked.
Checking the base.
Check the base on which the greenhouse sits to make sure that it is sound and rigid. The base may be brick/block or a specific metal base for the greenhouse.
If the base is loose, it will adversely affect the rigidity of the greenhouse (if the greenhouse structure is allowed to flex, this will weaken the joints and increase the chances of glazing panes breaking). Ensure that the base is solid, so that it does not allow draughts or pests to enter the greenhouse.
Checking the greenhouse framework.
Aluminium frame greenhouses
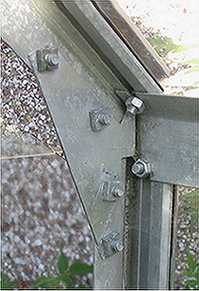 Check the joints of the members (i.e. wherever two or more members are bolted together), especially all the diagonal bracing members. On most aluminium greenhouses, some of the the members are secured using special bolts where the head fits into a channel in one member such that the bolt will not turn, and the second member is secured using a nut onto the bolt. These nuts/bolts do tend to seize after a couple of years so it is important to check the joints of new greenhouses and tighten the nuts at any loose joint while they can still be moved.
Also check for any physical damage to any member, this is more likely to occur at low levels and on corners where, possibly, wheel barrows etc may have knocked into the framework.
Wooden frame greenhouse
As well as checking the joints, which will typically be nailed, the whole of the structure should be checked for rot and other damage.
A wooden frame greenhouse normally needs painting at least every other year. Normally the timber just needs to be washed down and lightly sanded before repainting. However, as a timber greenhouse ages, the paint may build up to such an extent that stripping the paint back to the timber before repainting may be necessary. The best way to strip off the old paint is to use chemical paint stripper - do not use a heat gun near the glass.
Red cedar is often left unpainted but it is recommended that after washing down and giving it a light sanding, a good quality cedar wood treatment containing a preservative is applied.
Checking the glazing.
Broken/damaged glazing panes
The first thing to check is if any glazing panel is broken or cracked, replace any immediately. A local glass merchant will be able to provide a suitable piece, if a 'non-square' panel needs replacing, either take careful note of the dimensions or make an accurate cardboard cut-out for them to work to. Decide on which type of glazing material you wish to use as a replacement, there are three types of glazing available in the UK (other countries have different standards), Horticultural glass, Toughened (or Safety) glass and Plastic - check out this other page for details of the differences.
When handling glass panels, always wear gloves to protect your hands.
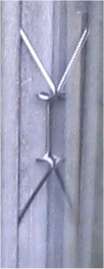 On aluminium greenhouses the glazing panes are normally held in place by clips, just removing these clips will allow a broken or cracked pane to be replaced - where the pane is overlapped by a higher pane, the higher pane(s) may need to be removed first. Make sure that the seal strip is clean and undamaged before installing a new glazing pane and use a 'S' clip as shown below on overlapping panes.
On wooden greenhouses the glazing panes are normally bedded onto putty or mastic and secured using glazing brads (pins) into the wood, the top surface of the glazing is left free of putty (unlike normal wooden framed windows). To remove the glazing, each brad needs to be removed using a pair of pinchers - care must be taken not to put any pressure on the glazing while doing this. Again, where the pane is overlapped by a higher pane, the higher pane(s) may need to be removed first. The old bedding putty may lift out with the glass or, more likely, will remain attached to the wooden beam - before fitting the new glazing, all the old putty should be removed from the beam (an old wood chisel is ideal) - care must be taken not cut into the wood and not to apply so much pressure that the adjacent glazing is damaged.
Insecure glazing
On all glasshouses, check to see that each glazing panel is secure.
On aluminium greenhouses the glazing panes are normally held in place by clips (as shown above) , check that they are all in place, in windy areas there needs to be roughly one clip per side every 300mm (12 inch) of a run.
 Check for signs of the panes slipping - slipping panes are normally due to the pane 'walking' as the frame is moved by wind or expansion/contraction due to temperature changes. 'S' clips (shown right) fitted at overlapping joints will reduce slippage.
On wooden greenhouses the glazing panes are normally bedded onto putty or mastic and secured using glazing brads (pins) into the wood, the top of the glazing is left free of putty (unlike normal wooden windows). Check that all the brads are in place, add new ones if any have become dislodged. Check for signs of the panes slipping - slipping panes indicates that the bond between the putty and glazing has failed, the panel needs to be fully removed and re-bedded onto new putty and secured with new brads.
Checking the ventilation.
Check the windows and louvres for damaged and insecure glazing - replace as necessary.
Check the hinges and catches etc on the windows and louvres - make sure that they are securely attached to the framework and that they operate freely and are not binding - replace any which are not fully free moving. Apply appropriate oil to the moving parts to ensure they do not seize up, especially over winter when they are less likely to be used.
You probably won't be able to actually check the operation of automatic ventilator openers, but you will probably become aware of any not working correctly during the summer, any faulty ones should be replaced as soon as they are noticed. Oil the linkages on these openers.
Checking the door of the greenhouse.
On hinged doors, check that the hinges are securely fixed to both the door and doorframe, and that any catch secures the door. Make sure that the door freely opens as wide as possible and that the door does not catch on the ground. When any adjustment has been made to the hinges/catch, oil them to ensure they do not seize.
On sliding doors, clean out the top and bottom channels and make sure the door slides freely between the fully open and closed positions without catching, adjustment on the top rail may be possible on some models. If necessary, oil the rollers and door catch - nylon rollers should not be oiled, but make sure that they rotate freely on their spindles.
Checking the guttering.
Clean out any guttering and down pipe. Check the joints of the guttering for leaks and repair if necessary.
Washing the greenhouse inside and out.
If possible, remove any staging from within the greenhouse before washing inside, it will make the job much easier.
Wash down the glass and framework inside and out at the end of end of each season with a brush using warm water with horticultural disinfectant or household detergent. Make sure that you clean into the corners where the glass meets the framework (this is where insects are most likely to hide). It is difficult, but make sure that you clean the overlap on the glazing, slipping a thin strip of plastic (such as a plant label) between the panes will made the job easier.
Wash down any staging using a brush and warm water with horticultural disinfectant or household detergent; really scrub any wooden staging and make sure that you clean between the slats of the top to remove any build up of material.