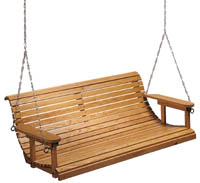
originally on shopsmithhandson.com
Porch Swing Diagrams
You’ll never find a Porch Swing of this quality at retail !
It’s built to last a lifetime — all in a single weekend !
Spring is almost upon us. Soon, our thoughts will turn to outdoor activities . . . barbecues on the deck or patio . . . a dip in the pool (if we’re fortunate enough to have one)…back yard get-togethers . . . gardening . . . cutting the grass . . . let’s stop here, while we’re ahead!
 Yes, just as sure as there are lots of “fun” things to do outside in the Spring and Summer, there are also those yard-related chores that we must all attend to. And what better place to sit down and enjoy a relaxing evening after the day’s activities than on your own custom-made Porch Swing, like the one shown here.
This one’s a real “beauty” -- and by following the plans we’ve included here, you can make this Swing yourself easily and quickly in about a week-end. When you’ve finished, you’ll have a Porch Swing to rival any of the old “classics” you could hope to find at an antique shop, garage sale or flea market. And the best part of all is that you will have built it yourself !
For the letter references in the instructions below refer to the related diagrams.
Before we get started, here are a couple of important points for consideration:
STEP 1:
Plane your stock for the three back supports (B), three bottom supports (C) and 21 slats (A) to the desired thickness. Our guidelines call for 7/8-inch, 7/8-inch and 5/8-inch, respectively. Remember, you may choose to make these parts thicker if you are lengthening the swing or using lumber that may not be as strong as oak.
STEP 2:
Cut the back supports (B), bottom supports (C) and slats (A) to size/length, according to the List of Materials.
STEP 3:
Using your bandsaw or scroll saw, cut out the contours for the back and bottom supports (B & C). For best results, use the pad sawing technique with double-faced tape to cut multiples of the same profile at the same time.
STEP 4:
Using your drum sander, sand all the support profiles (B & C) while they’re still taped together.
STEP 5:
Again . . . while they’re still taped together . . . drill 3/8-inch diameter holes at the locations indicated in the support pattern.
STEP 6:
Untape the back and bottom supports (B & C) and assemble them with carriage bolts, washers and nuts. Tighten securely (see Support Assembly).
STEP 7:
Mount one slat (A) to the flats on the front edges of two of your bottom supports (C) — and another slat (A) to the flats on the top edges of two of your back supports (B).
NOTE: Be sure to allow EXACTLY 1-1/2-INCHES of overhang on each end of your slats. Use your #8 x 1-1/2-inch wood screws, pilot-drilling and countersinking all screw holes in your slats, as well as your bottom and back supports, prior to assembly.
STEP 8:
Place your center assembled support (or two, if you’re lengthening the swing) so it’s spaced evenly between the two side supports and attach the support to the two slats using 1-1/2-inch wood screws.
STEP 9:
Using a couple of 1/4-inch thick pieces of hardboard or plywood as spacers, mount the remainder of the slats (A) to the back and bottom supports using 1-1/2-inch wood screws on each end and in the middle.
STEP 10:
Plane the stock for the arm rests (D), arm braces (E) and arm posts (F).
STEP 11:
Cut the arm rests (D), arm braces (E) and arm posts (F) to size, according to the List of Materials.
STEP 12:
Again, using your bandsaw or scrollsaw, cut the contours for the arm rests (D) and sand smooth using your drum sander .
STEP 13:
Bore a 3/8-inch dimeter hole, 2-inches from the top ends of the front arm posts (F) . . . and another hole 1-1/8-inch from the bottom ends of the front arm posts (F).
STEP 14:
Using your 1-1/2-inch wood screws, attach the arm braces (E) to each side of the tops of the arm posts (F) as shown in the End View.
STEP 15:
Remove any slats (A) which may be located at the points where the arm assemblies connect to the bottom and back supports of the swing.
STEP 16:
Using clamps, temporarily mount the arm posts (F) to the outsides of the bottom and back supports, as shown.
STEP 17:
With four clamps holding the posts (F) in position, bore your 3/8-inch diameter mounting holes through the arm supports and the bottom supports. Secure with carriage bolts, washers and nuts.
STEP 19:
Attach the back ends of the arm rests (D) to the outsides of the two back supports, using two 1-1/2-inch wood screws (counterbored, if necessary) on each arm end.
STEP 20:
Cut the slats you removed previously so they fit around the backs of the arm rests (D) and the arm posts (F). Replace the slats and screw them back into position.
STEP 21:
Attach the eye bolts as indicated.
NOTE: When tightened, the eyes should be positioned vertically so the closed portions of their loops are at the top.
STEP 22:
Finish with polyurethane or the finish of your choice.
STEP 23:
Hang securely with chain and enjoy!


