Vertical Open Board Fencing
A vertical open board fence is a traditional fence which provide boundary definition, is fairly attractive and robust and is fairly easy to maintain.
The method of post and rail construction are given on this page, this page you are reading on Vertical Open Board Fencing addresses the cladding of the posts and rails.
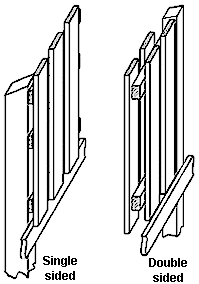 There are two basic choices of open board fencing:
- Vertical boarding.
- Double sided vertical boarding.
An advantage of the double sided construction is that privacy is increased while the 'open' form of construction reduces the effects of wind when compared with a solid board fence. Thus double sided open board fencing are suitable for fairly exposed sites.
Even though the finished fence should be treated with a good quality preservative, all timber used on a fencing should be pressure treated with preservative to give it a long life exposed to the British weather.
Fence rails
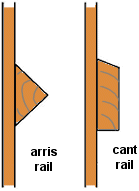 Fence rails are required between the posts, either arris or cant rails, either fixed between the posts, or cant rails fixed onto the front face of the posts.
However with a double sided, vertical board fencing, arris rails are not suitable (as boarding needs to be fixed to both front and back of the rail) and standard cant rails are a bit on the narrow side - alternative solutions to consider are:
- Fix rails to the both sides of the fence, either in line with the faces of the posts, or, cant rails, across the faces of the posts.
- Fix rails of the same size as the posts, between the posts; this will often involve the use of a lot of timber, so the above suggestion may be considerably cheaper.
Gravel board
Where the bottom of the fence is to ground level, a gravel board should be fitted below the fence boards. The gravel board is normally of a hard timber (such as oak) to withstand the damp rising from the ground. If the gravel boards do rot, they can be replaced without having to replace all the vertical boards. Where a vertical board fence is erected above masonry or concrete, there should be a clearance of at least 5mm (quarter inch) under the gravel boards - this should prevent the bottom of the boards becoming waterlogged providing it is kept clear of material build-up.
Where you are happy for the vertical boards to end at least 75mm (3 inches) above ground level, there is no real need for gravel boards.
Vertical board fencing
Before starting to assemble vertical open boarding, decide on the gap required between the boards. You may decide to have no gap, but this can cause unsightly gaps after the timber has contracted and expanded after a few repeated exposures to dry and wet weather.
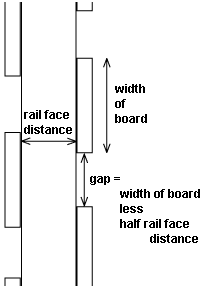 The gap between boards on a double sided vertical board fencing should be about the board width less about half the distance between the faces of the rails on each side of the fence.
Having decided on the required gap between boards, make up a gap gauge to suit - just a straight length of timber of the required width (gap) and as long as the boarding will suffice.
Before nailing the first and each subsequent piece of board, check:
- The length of the board - it needs to go from the top of the gravel board (or the required height above ground level) to the desired height.
- The angle of the bottom of the plank - if the fence is not on level ground, the gravel board (if fitted) will be at an angle, the bottom of the plank can reflect this angle, alternatively on a single sided fence (where privacy is not so important), the bottom ends of the boards can be left square, with a gap of about 3mm (1/8 inch) between the nearest corner to the gravel board.
- Before starting, think about these points concerning the top of the planks:
- If the fence is on level ground, the planks can be cut to size before fitting.
- On sloping ground:
- The tops can be cut at an angle before fitting to give a smooth line,
or - The tops can be left square to give a 'stepped' appearance - this is generally best suited where the slope is gentle - where each sequential plank has a step of less than about 6mm (0.5 inch),
or - The tops can be left to be tidied up after the fence is complete.
- The tops can be cut at an angle before fitting to give a smooth line,
With the posts, rails and gravel boards in place, position the first board in place at one end of the fence - there should be a 'natural' place to start, either at a gateway or at the end of a straight run. When you have checked the first board to make sure that it is the right length and the ends have been trimmed (if necessary) to suit the gravel board and the top edge:
- Offer up the board, keep the plank about 3mm (1/8 inch) off the gravel board (if fitted).
- Use a spirit level to make sure that the board is vertical.
- Use galvanised nails to 'tack' the plank to the rails/post - with plain galvanised nails, drive them in at an angle - alternatively, use galvanised annular ring nails.
- Check again with the spirit level that the board is still vertical after tacking, if it is - drive the nails home, if it is not vertical, adjust the plank as necessary. Two nails at each rail is normally considered enough.
For each subsequent board, check the cut angle of the bottom and the length - offer it up and use your gap gauge to set the position horizontally, check the line of the top of the board with the previous board and nail it in place again using 2 nails per rail. Check every fourth or fifth board with a spirit level to ensure that you continue to fit them vertically, if necessary, adjust before continuing.
To trim the top of the fence if this was not done during construction, stretch a chalked string line along the top of the fence against the planks and pluck it to mark a line. Saw along the line to trim the top of the fence to a single line.
When you have finished the fence, checked the fence to ensure that nails have been driven home on each each plank, on each rail/post.
Additional for double sided board fencing
Putting up the boarding on the second side is similar to the first side plus paying attention to these addition points:
- The first board on the second side needs to be positioned so that it equally overlaps the gap on the first side.
- When every forth or fifth board is checked to the vertical, also check and adjust the amount of overlap on the gap on the first side.
Treating the fence with timber preservative.
The final job is to apply a good quality wood preservative. Modern wood preservatives are available in various colours, these tend to mellow after a bit of weathering, but it's still worth thinking carefully before choosing a bright/vibrant colour.
Before applying the preservative, read the manufacturer's instructions carefully and take any recommend precautions - often this may entail protecting the surrounding soil and garden plants and the use of appropriate safety gear (goggles, gloves etc).