Garden wooden panel fence
erecting the fence panels - fitting the gravel boards - finishing off
A well-erected wooden panel fence is more than just a boundary; it can increase the attraction of your property especially if climbing plants are trained up and/or along it. Panel fences will restrict children and animals to certain areas.
Remember that where the panel fence is to run along a boundary, the fence posts should be positioned on your side of the boundary; by 'custom and practice' the fence is normally attached to the posts facing the neighbour; but this is not a legal requirement.
If plants are to be disturbed during the erection, try to do the work in early spring or late autumn so that the disturbed plants have time to recover after the work.
Wooden fencing panels tend to be erected with wooden posts although other types can be used if required. Wooden posts can be sunk into the ground or can be mounted in metal spikes/inserts - see the separate page for details of the options for fence posts and how they are used.
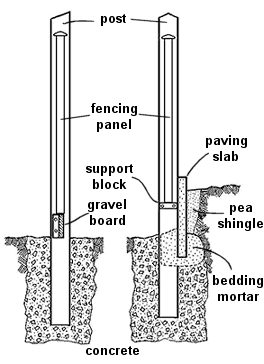
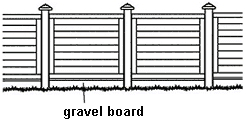 Where the bottom of the wooden panel fence is onto soil or vegetation, a gravel board should be fitted below the panel. The gravel board is normally of a hard timber (such as oak) to withstand the damp rising from the soil. If the gravel boards do rot, they can be replaced without having to dismantle the complete panel fence. Where fence panels are erected above masonry or concrete, there should be a clearance of about 5mm (quarter inch) under the panel - this will prevent the bottom of the panel becoming waterlogged.
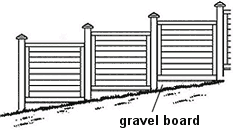 If erecting the wooden panel fence across a slope, the top of adjacent panels can be stepped to more-or-less follow the slope. Try to keep the depth of the steps uniform or increasing in one direction - where the slope of the ground makes this awkward, consider using different heights of fence panel or depths of gravel board.
Erecting wooden panel fences
First clear away all obstructions and ensure a reasonable ground level before pegging out the line of the fence with string. Clear away plants etc. from along the line of the fence, about 300mm (1 ft) on both sides of the line, more where the posts will go. The plants can be replaced after the fencing has been erected.
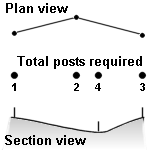 Roughly mark the position of the posts for the ends and any bends of your fence (1, 2 and 3 shown on figure). You now have the straight runs roughly identified. Look at the slope of the ground and mark any point where the angle of the ground level changes significantly (4 on figure). These are the main points where there MUST be posts.
Measure the distance(s) between the points where you must have posts. Use these measurements to calculate the number and sizes of fence panels required - there is normally a range of panel widths so you should be able to make up the distance with complete panels of differing widths. DO NOT forget to allow for the width of the fence posts when calculating the sizes required.
The sequence is to erect a pair of posts, then a fence panel and then another post, another fence panel and so on. Where the posts are going to be set in concrete, they should initially be secured with rubble and concreted in after the fence has been erected.
|
Tip: DO leave the concreting until the fence is complete, this will ensure that the posts and panels are a tight fit. If you try to erect all the posts before hand, you will need to be very, very accurate (to within about 2mm) or you will have gaps between the panels and posts. |
Mark the position of the first post and erect it as appropriate.
Fix a taut line between the first post and the end of the first straight, flat run.
Hold the first fence panel against the post, and use scraps of wood or bricks to support it off of the ground by the height of the gravel board. Position the next post; remove the fence panel and erect the next post. If running a fence over flat ground, check that the post tops are level - use a spirit level on a straight edge between the post.
Reposition the fence panel and secure it to both posts by:
- Using three 63mm long (2.5 in) galvanised nails or screws (drill clearance holes in the uprights of the panel if using screws) on each side of the panel and each end of the panel.
Or 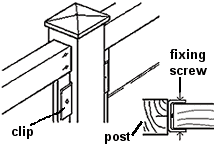 Using
special panel clips secured to the fence posts - these make it easier to remove/replace fence panels in future but the panel will have to be lifted up to remove it.
Using
special panel clips secured to the fence posts - these make it easier to remove/replace fence panels in future but the panel will have to be lifted up to remove it.
Offer up the next fence panel and post, and repeat the process until the fence is completed; pay attention to aligning the top of adjacent wooden panels and ensure that the front of each panel faces in the same direction. As you work along, you may need to brace the erected fence if the posts are going to be secured with concrete.
When the fence is complete, mix up the concrete if required and fill in around each fence post (use a dryish concrete mix (1:2:4 cement: sand: coarse aggregate)). Check that each post is vertical and brace each post if necessary until the concrete has gone off. Finish the concrete so that it has a slope away from each post, this will prevent water collecting around the post itself.
Fitting gravel boards
 And
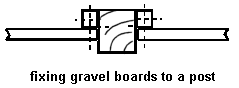
finally after any concrete has hardened, fix the gravel boards under the panels. Cut the boards to length so they fit between the fence posts. Nail or screw them (using galvanised nails/screws) to blocks of wood which in turn are nailed or screwed to the fence posts.
And
finally after any concrete has hardened, fix the gravel boards under the panels. Cut the boards to length so they fit between the fence posts. Nail or screw them (using galvanised nails/screws) to blocks of wood which in turn are nailed or screwed to the fence posts.
 Align
the blocks so that each gravel board fits under the fence - leave a slight vertical gap to avoid a water trap.
Align
the blocks so that each gravel board fits under the fence - leave a slight vertical gap to avoid a water trap.
Make sure the gravel boards and fixing blocks have been treated with wood preservative before they are fitted - most fencing suppliers sell gravel boards pre-treated.
Where the ground is higher on one side of the fence, use concrete slabs instead of gravel boards. Bed the slabs down onto a bed a mortar and pack behind the slab with pea shingle. Ensure that there is a gap between each slab and the fence panels/posts. Fit a draining tube under the slabs at about every 1m (3 ft).
Finishing off
Fit caps to the fence posts if required.
Coat the panels and posts of the fence with a good quality wood preservative - clear or in a colour of your choice.
Replace any plants which were removed before the panel fence was erected.
erecting the fence panels - fitting the gravel boards - finishing off