Building a pond using a liner
also see our page for planning a garden pond
 Using a pond liner is a popular choice for several reasons: it's easier to transport since it comes folded in a box; it's easier to install than a rigid plastic shell, it also allows you complete freedom of choice as far as the pond shape and depth are concerned, and this is the type of liner that Wickes sell. The thickness of the liner ensures long life so long as it is properly installed, it can be repaired easily with patches if it is punctured accidentally. Also, the fact that it follows the contours of the ground results in a much more natural-looking pond.
The Wickes pond liners are made from black PVC, which gives a greater impression of depth than other colours and is more resistant to degradation by ultra-violet light.
Think about spoil disposal
Digging big holes creates a surprisingly large amount of spoil, so unless you can disperse it elsewhere in the garden or you are planning to use it as the base for a rockery or other raised feature, you may have to order a skip and have it taken away.
Tools you may require
If you are planning a large pond or you have particularly rocky subsoil, it may be worthwhile hiring a powered breaker or even a mini excavator to make the digging easier.
A builder's barrow is worth hiring for moving spoil if you have only a flimsy gardener's barrow. And if you're disposing of a lot of spoil, a power barrow - a motorised wheelbarrow - will make light work of moving it from pond to skip.
A large angle grinder will be necessary if you intend to cut paving slabs to fit around the perimeter of the pond.
Decide how big a pond liner you need
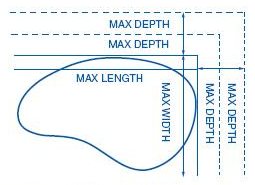 Once you have decided on the size of your pond, you'll need to calculate the size of liner your require. Each dimension will be - the distance across the pond plus twice the depth plus twice the overlap at the edges.
As an example: if your pond is to be 1m by 2m and 0.5m maximum depth, the size of the pond liner will be:
POND LINER WIDTH = 1m (for width) + (2 X 0.5m (for depth)) + (2 x 0.23m (for overlap at the edges)) = 2.46m
and
POND LINER LENGTH = 2m (for length) + (2 x 0.5m (for depth)) + (2 X 0.23m (for overlap at the edges) = 3.46m
Use your own figures to work out the size of pond liner you need for your pond.
Work Sequence:
- Decide on the site, and mark out the pond shape with hose or rope.
- Cut and remove turf from the pond site, saving it for use elsewhere in the garden if required.
- Excavate the pond site to the level of the marginal shelf.
- Mark out and excavate the 'deep end'.
- Line the hole with a layer of soft building sand and an underlay material.
- Remove turf to allow for the edging.
- Position the liner over the hole.
- If you are having a waterfall, position a liner for it.
- Start filling the pond liner.
- Trim off excess liner when the pond is full.
- Lay paving stones or other edging material.
- Run in and connect the power supply.
- Stock the pond.
1. Decide on the site, and mark out the pond shape
Take your time in deciding what shape of pond you want, use a length of hose or rope to represent the shape on the ground. Adjust the hose position as required and view the shape from an upstairs window to get a better idea of how its shape and proportions fit in with the garden as a whole. If you are having an informal shape, avoid sharp curves; gentle sweeps look more natural.
Don't forget that you need a minimum surface area of about 3m² (32sq.ft) if you expect your pond to become self supporting as far as plant and aquatic life is concerned; smaller ponds may not contain enough oxygen and so tend to stagnate.
2. Cut and remove turf
When you're happy with the shape and size, cut round the perimeter with a spade or lawn edger. Then cut across the pond area in parallel lines about 300mm apart, and lift the resulting strips of turf. If you want to reuse them elsewhere, roll the strips up carefully, stack them out of the way and keep the stack moist until you are ready to re-lay them. If you don't want them, offer them to neighbours, turn them into compost or dispose of them in your skip.
3. Excavate to marginal shelf level
Start excavating the pond area down to the marginal shelf level, saving good topsoil for use elsewhere in the garden. For the deluxe pond, dig down to a depth of about 320mm (12") below ground level which will give you an eventual water depth of about 230mm (9"). Slope the sides at an angle of about 45°, clearing any roots and sharp stones as you work, then check that the base of the excavation is roughly level using your spirit level set on a timber straightedge (diagram 2 below).

4. Excavate the deep end
Next, mark out the area that will form the 'deep end' of the pond. This is normally the central area, but it is not essential to have a marginal shelf all the way round.
 Diagram 3 shows some layout possibilities.
Excavate the main section to a depth of between 550 and 700mm (21 to 27") below ground (lawn) level; the latter is better, since it guarantees that the pond cannot freeze solid in winter. Your eventual water depth in this area will be about 450 to 600mm (18 to 24").
As you work, try not to break down the edges of the marginal shelf, and do not make the sides of the deep end too steep - an angle of about 45° is about right here too.
Again, remove roots and sharp stones as you find them, packing soil firmly into the resulting holes.
5. Line the hole with sand
Double-check that there are no stones left in the sides of the excavation which could puncture the liner, especially on the edges of the marginal shelf or the slopes down into the deep end. Then line the excavation with a maximum 25mm (1") thick layer of damp building sand, patting it into place on the slopes and firming it down on the bottom and the marginal shelves. This will help to cushion the liner and prevent any rogue stones from penetrating it once it is filled. It is well worth covering the sand with an underlay to further protect the liner in the event of the sand being washed away. An ideal material is the Wickes 620-801 Acoustic Underlay normally used under Laminated Flooring and available in 15 x 1 metre rolls.
6. Remove the edging turf
With the excavation complete, the next step is to remove turf round the pond to allow for the edging stones.
Lay the stones in place so they overlap the pond edge by about 50mm (2"), and mark their outer edges on the grass with your spade. Then lift the slabs aside, cut and lift the turf and remove the topsoil to a depth of about 65mm (2½") - enough to allow the slabs to be bedded on mortar once the pond is filled. Use an angle grinder to cut slabs to fit if necessary but make sure that you are wearing a nose and mouth mask and goggles for protection.

Check that this perimeter strip is perfectly level all round; if it is not, parts of the liner will be exposed above the water level, and will begin to deteriorate due to exposure to sunlight.
7. Position the pond liner
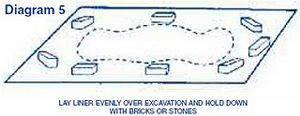
Drape the liner over the excavation without disturbing the sand or any underlay, aiming for an even overlap all round. On concave curves, pleat and fold it neatly. Don't make it fit the pond contours precisely at this stage though. It will look better if it is allowed to stretch slightly as it is filled, since this will help to pull out many of the creases. When you're happy with its positioning, anchor its perimeter with bricks or stones.
8. Position the waterfall liner
If you are having a waterfall, now is the time to install its liner - in an existing rockery, or on a new earth bank. Use an offcut from the main liner. Form the top pool first with a depth of about 120mm (4½"), then create a channel for the liner down to the pool. One of the easiest ways of doing this is to lay roof ridge tiles upside down in the channel to form the cascade, and then to position the liner over them and tuck the excess material underneath.

Alternatively, lay the liner directly in the channel, anchor its edges with stones, and use pieces of paving slab underneath it to help form steps over which the flow can cascade. Position another slab at the point where the waterfall will discharge into the pond, to ensure that the water does not 'miss' the pond edge. Then bury a length of 25mm (1") hose running from the pump position in the deep end of the pond, over the pond edge and up the slope to the top of the waterfall, covering it with pieces of slate, tile or similar so it is hidden but not squashed when buried or pierced by gardening tools.
9. Start filling the pond
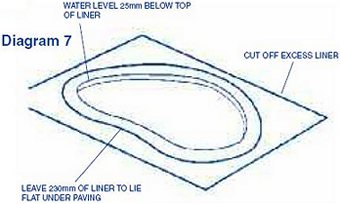
Start filling the liner with water from a garden hose. As it fills, neaten folds as necessary and ease off the perimeter bricks to allow the liner to bed against the contours of the excavation. As the water level nears the top edge of the liner, check to see how level the pond perimeter is and scrape away soil to get rid of any high spots or make up low spots with well compacted sand. Fill the liner to within 25mm (1") of the top.
10. Trim the liner
Trim off excess liner all the way round the pond with a sharp knife, leaving an overlap of about 230mm (9") which will be concealed by the edging stones.
If you are planning to turf-up right up to the pond edge at any point, cut slits in the overlap so the grass roots can grow through them into the soil below.
11. Lay the edging paving stones
Tidy up the site, and lay the edging stones round the pond on a 25mm (1") thick mortar bed. It is not safe to bed them on sand, as you would on a patio, since someone standing on the edge might tilt the slab and be thrown into the water. Check that the slabs are level, and point between them. If you are having a pump and waterfall, conceal the hose to the waterfall by positioning it between two slabs, and set a short length of copper pipe or plastic conduit beneath the slabs to allow the pump flex to be passed through safely and unobtrusively.
12. Run in and connect the power supply
All electrical work must conform to BS 7671 the current IEE Wiring Regulations, and Part P of Building Regulations. You are advised to check with your local authority's Building Control Department, or an Authorised Competent Person, before starting. If in any doubt about electrical work, contact a qualified electrician.
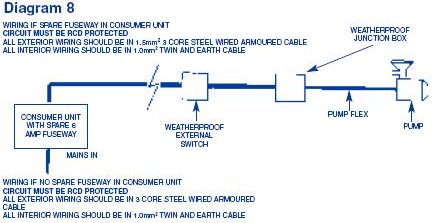
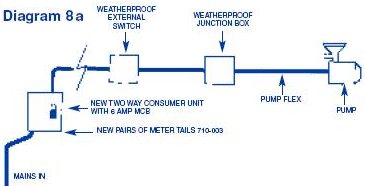
Run in the power supply, using 1.5mm² toughened twin and earth cable buried at least 500mm (20") underground between the house and the pond site. At the pond end, pass the pump flex through the pipe or conduit under the perimeter paving and connect it to the toughened cable within a weatherproof junction box; then form an above ground chamber for the box which you can later conceal with rocks or shrubs. The simplest solution is to set the box on a brick or block and cover it with a ridge tile; alternatively, mount it on a low timber post and shield it from the weather by making a small canopy for it from exterior quality plywood or fencing offcuts. Indoors, run 1.0mm² twin and earth cable to the consumer unit position and connect to either a spare fuseway or miniature circuit breaker (MCB) in a new consumer unit mounted nearby. You must call a qualified electrician or your local electricity company to connect this unit to your mains supply. Fit a 6 amp fuse in the fuseway, or use a 6 amp MCB, and label it 'POND SUPPLY'. See Diagram 8 (below) for full wiring details.
Now connect the waterfall hose to the pump outlet, and set the pump in the pond on bricks or pieces of paving slab so the fountain jet is just above water level.
Switch on the power by turning the residual current device (RCD) to ON, so you can test the system. Adjust the water flow as necessary using the flow adjuster. Do not restrict the flow too much as this can damage the pump over a period of time.
13. Stock the pond
Complete the pond installation by adding marginal, deep-water and oxygenating plants.imgfive change from time to time and the customer is advised to check that the design, descriptions, specifications and techniques of constructing any of the products described in this leaflet are still valid at the time of purchase or placing an order.
© Wickes Building Supplies Limited 2000. All rights reserved. www.gardeningdata.co.uk/ has Wickes permission to reproduce this article.
All rights reserved. No part of this publication may be produced or transmitted in any form or by any means electronic, mechanical, photocopying, recording or otherwise or stored in any retrieval system of any nature without the written permission of the copyright holder and the publisher.
[
Alpines - Articles - Bonsai - Books - Building Projects - Cacti - Climbers - Compost & Soils - Flowers - Fruit - Garden Design - Garden Features - Garden Furniture - Gardens to visit - Glossary - Hedges - Herbs - Hydroponics - Lawns - Organic - Pests and diseases - Propagation - Roses - Suppliers - Tips and Hints - Trees & Shrubs - Tropical - Vegetables - Water Gardens - Wildlife
submit a URL - privacy policy - terms and conditions - contact us